Providing OEM, Wholesale and Retail Services Worldwide. Toll Free : 1-800-717-5818 (U.S. )

FIGURE OF OUTLOOK OF DIGITAL THICKNESS GAGE
TECHNICAL SPECIFICATIONS
FUNCTIONS
OPERATION
BATTERY REPLACEMENT
NOTES
BRIEF ON MAINTENANCE
FIGURE OF OUTLOOK OF DIGITAL THICKNESS GAGE
(1) Three-button digital thickness gage (see figure 1)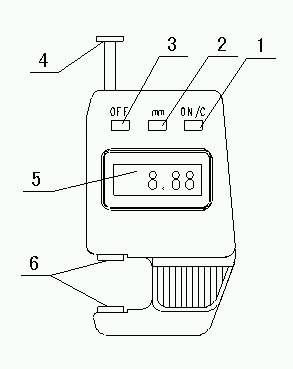
Figure 1
1.ON/C button for zero setting
2. mm button for mm/in conversion
3. OFF/ON button
4. Cap
5. LCD
6. Upper measuring face/Lower measuring face
(2) Two-button digital thickness gage (see figure 2)
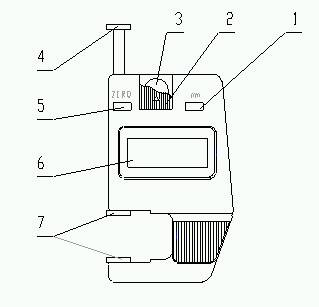
Figure 2
1. mm button for mm/in conversion
2. Battery cover
3. Cell button
4. Cap
5. ZERO setting button
6. LCD
7. Upper measuring face/Lower measuring face
(3) Point digital thickness gage (see figure 3)
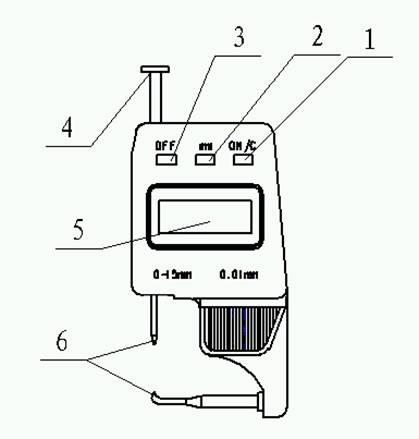
Figure 3
1. ON/C button for zero setting
2. mm button for mm/in conversion
3. OFF/ON button OFF/ON
4. Cap
5. LCD
6. Point measuring faces
Resolution: 0.01mm
Power: One 1.55V cell button
Working temperature: 0~+40�?br />
Storage temperature: -10℃~+60�?
Relative humidity: �?0%
1. mm/in conversion at any position.
2.
Zero setting at any position.
Preparation: Clean measuring faces of a digital thickness gage with dry and soft cloth.
Operation: Press MM button to switch on power; press mm button to select mm or inch. Press Cap and press ON/C button when upper measuring face contacts with lower measuring faces. Then it is able to take regular measurement.
Remove the small round battery cover on the back of a digital thickness gage and replace the battery by pressing, turning it around about 90°.Mind that the positive pole must face out.
If the battery bought from market does not work satisfactorily (the power may wear down because of the long-term storage or the battery’s automatic discharge etc.), please do not hesitate to contact the supplier.
1. A digital thickness gage is precision measuring instrument which should be prevented from strike and drop to avoid losing precision.
2.
The gage must be kept clean. Water and other liquids must be prevented from entering it to avoid damaging its electronic parts.
3.
The surface of the indicator can be cleaned with pure alcohol. Never use acetone.
4.
No voltage should be applied on any part of the indicator and never carve on it with an electric pen for fear of damaging the electronic circuit.
5.
It shows the circuit memorize if digits get fixed after battery replacement. Then take out the battery and put it back again after one minute.
6.
Take out the battery if the indicator will stay idle for a long time.
Troubles |
Possible Causes |
Solutions |
Flashing digits |
Low voltage |
Replace the battery |
No Display |
|
|
Fixed digits |
Accidental trouble in circuit |
Take out the battery and put it back after one minute |
Buy Quality Electronic Digital Thickness Gages at Tresnainstrument.com Now!
